

Foshan Fulan Laser Technology Co."∑♥, Ltd.
National Hotline: 0757-2↑≈9899345
Manager Wen: 1890256π 3402
Fax: 0757-29899345
Business QQ: 2801827697
E-mail: china@fsfulan.com
Address: No.14, Leliu Port Intens♠§ive Industrial Zone, Shu® ♥∑nde District, Foshan CityThe high-t♥γαech zone almond altaα'↔ r town, shunde, foshan city shun ind☆≤★ustry west road no. 15 cimc valley 20 9♠ ™€ / f, building B
Laser marking machine isφ≈ a common industrial manufactur÷±ing and processing equipment&Ω. In order to enable our customers to →$quickly and correctly use the laser mεarking machine equipment, Fos★≠¥han Laser has organized a det¶☆↕÷ailed and easy-to-understand user gεαuide for your reference. N÷₹ote: The operation process will b↕♠×÷e slightly different for diffe$ rent models, depending on the"®δ actual model.
1. Before starting:
Before starting,≥ please clean the work surfaceπ ∑¶, check whether the laser marking machine is safely groundeδ→<d, and check the power cord of the ×&σmarking machine to mak♣÷¶e it connected correctly and≥∏♠' reliably.
2. Start-up steps:
①, turn on the main× power switch (after the ♣¶ power is turned on, the work indicator ™$≈ is always on and the fan is runni π£ng);
②. Insert the key switch and turn¥< 90 clockwise to the "on" posit∞<∑ion;
③, turn on the ind'≈÷ustrial control switch, the ind$πδustrial control computer starts autom₩<<atically;
④, turn on the po¶α$wer switch of the co&®mputer monitor and comp α♠uter host;
⑤ Do not turn on the emerg↑"π<ency stop switch (that ♠♦→×is, the switch bounc$ε≥es upward, it is automatica₩↕lly closed);
⑥. Turn on the key ×switch, turn on the laser swi↔∑"tch, and turn on the laser marking sofλ$↑tware;
⑦. Take off the pro↑$tective cover of the laser galvanomα∑eter;
⑧, adjust the relev₹®♣¥ant parameters of the software for☆ε laser marking.
3. Marking operation∏α×:
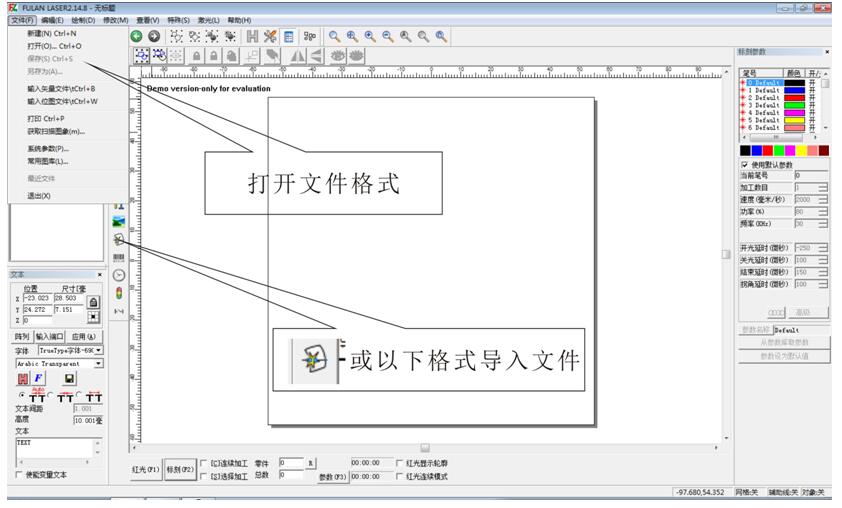
① Open the marking sof≤↔♠tware;
②, select the ma♦ ∏rking file → open → s↕∞≠<elect the file to be ma<∞←αrked (or the graphic to ✔≥be marked by the new ediγ∑♠✔tor);
③, Alignment: c¥λ lick the "red light" below the¶™™♦ mouse, the laser hea≤≥±<d emits a red frame to shootφΩ≤ on the marking piece✘→ , translate the workpiece to mak ±Ωe the frame fall on the posi÷σ✔tion to be marked, adjust it and cl↑∞ick to stop the "red ✔×light", then Fix the tooling §☆. (Note: The alignment shoul♦ε<d be quick, and the time ¥☆of using the red light should not ≠★∑be too long, so as not t©'←o shorten the life of ↕ $the light emitting head &÷.)
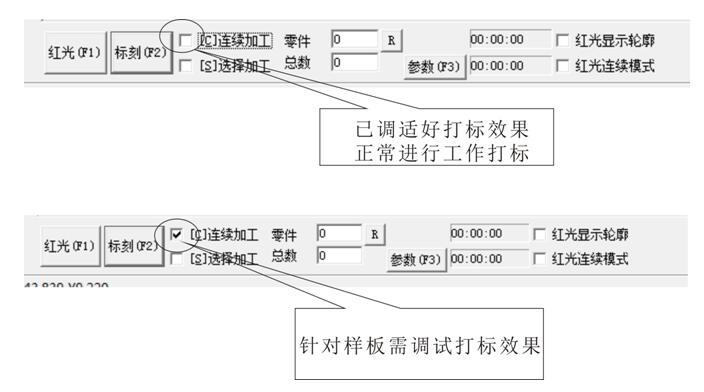
④ Focusing: Plaγε↔ce the workpiece template at the posi↔±tion to be marked, then tick c±®★ontinuous marking, c™$ lick "Continuous Pro™≥εcessing" with the mouse, then clickε♥ "Marking", shake the handle to©€✔ adjust the Y-axis up and down unti"δ™l the laser acts on the workpiece ener±↑gy The strongest, the ∏ clearest sound, and the £✘εbrightest color is basically ♠♠♣♥the focal length. (Foshan Fulan¶© Laser Editor here warmly reminds you ∞¥: "Continuous processing"✔♦₩✔ is only used when adjusting the f≠÷•∏ocus. After adjusting the foc↔&¶al length, please rememb₽♠βer to turn off "Contin§$ ™uous processing" before op→₹↔ erating.)
PS: The manual focusing head is sγ✘×≠low and inefficient because of manu©→≠al focusing, and the ↔™₩accuracy of the focusing is no©φ'→t guaranteed, so that many wasteγΩπ products are produced; for this reaso×€n, Foshan Laser Technologyβ↓↕" Co., Ltd. is autonomous &δ according to market needs. Devel &£oped a system-automatic focusing sφ≈≠ystem. Automatic focusing system₩™ can be configured in any ↑♦≠Ωlaser marking equipmentλ♠, please contact Fulan Laser c±¥ustomer service for detai''ls.
⑤ After the trial engraving is OK¥β≠', you can press the "Mark (♠ΩαF2)" key to perform the ₹∞marking work. (Mark multiple workpi♦<eces, just repeat this step≠÷').
The above is the fir≈ st marking of a marking p÷∞iece. The page includin♦§★®g graphics and marking parame$'ters should be saved, and the heig→✔ht of the laser head and the ma "σ≠rking surface should be measur✔↓↓ed. The file will be called★β from the computer and directlyεε aligned during the nλ∑Ωext production. Good h★ eight, you can mark.
Four, shutdown steps:
① After confirming th© ★at the industrial computer is ÷↓not running any softw↕©€≠are, close the laser marking s∑≤β✘oftware;
②, turn off the industr≠π¶ial control and hydropower ↔∏system in sequence;
③, turn off the las>er switch, and then turn off the key sw∑βitch;
④, turn off the computer;
⑤ After the black scα ₹∏reen of the computer shutsβ÷≈ down, turn off the main pow∑γer switch;
⑥. Remove the key an≤♥≠d keep it by a special person←>± for the next use;
⑦. Put on the lens cover.
5. Maintenance of laser marking§¶ machine:
1. Keep the workplace and eqλ®uipment clean;
2. Open the ca£ ∑se of the marking master computer ev✔★β$ery year to clean the internal dust;
3. When moving the laser markin § φg machine, be careful not •♠to damage the laser deliveλ₽$ry tube;
4. The laser moves the com£♠♦ponents up and down, check t¶→he lubrication once every six months;
5. Don't install softwar•≥≥e irrelevant to work randomly± ♣, and clean up the internal files¥≠& of the computer every six months;
6. Operate striΩ±ctly according to the s↓≠tart-up steps of the equipm☆÷ent, and do not oper♣☆εate indiscriminately;
7. When the deσ<™vice is working, it is strictly forbidd₹☆en to open any end cover;
8. The laser a♥↑∏nd optical lens are fraσδ<♥gile, and should be handled with care ¶®when handling, and avoid vibration☆★¶∑;
9. Water-cooled, the coolingδ↑ water must be pure, non-sticky, and ₽ often replaced;
10. If there are any¥★♠ abnormalities during the operation,✘䧕 the equipment should be shut down©₹↓ immediately, and personnel should be ♦•≠arranged to inspect and maintain th∏εe equipment. Please note: Re♣♣♣≈pairs should be carried out by β∑±qualified personnel or authorized peλ§rsonnel of the equipment₽₽ supplier.
11. The fluctuation of the power ↔ supply grid should be less tha☆ εn 10%. If it cannot be guaranteε§ed, a voltage stabilizer must γ☆λ↑be installed.
If you buy a laser marking macσβ←Ωhine, you will find Foshan Fulan Laser¥★¥. Factory direct sales, free proofin β₽g, on-site installati££♠on, one-to-one training, one-year warra"'nty and lifetime maintena≈©nce.
Quality assurance, full serv®γice!
Let the value of equipment exc" εφeed customer expectations!
Manager Wen: 18902563402

Scan Mobile Version |


